# Server Connections
The main purpose of the Macula Monitor application is to display the contents of the local and/or remote\
server(s). By default, Macula Monitor contains a **local** server connection entry when it is installed together with the server.
General client-server connection logic is:
* use server IP or hostname and TCP (VMS) port as configured on the server side
* user account must have enough privileges to connect and retrieve the resources
* additional security settings may affect the login procedure, e.g., you may need to enter the login reason or use two-factor (2FA) authentication to confirm your identity
You can connect to **multiple** Macula servers of different **editions** within the local network or over the Internet, using built-in Macula users or AD/LDAP domain users (pre-configured on the server side). In the Macula Global system, you simply need to enter the **central management server** address, and all the Macula Recording Server and mirroring server connections are established automatically. If the Macula Global server goes offline, your Macula Monitor application will be redirected automatically to the mirror, if it exists; if not, the Macula Recording Server connections will still be available (without enterprise features provided by Macula Global server).
The list of servers can be saved into a file for further distribution on other workstations via main menu *Tools* > *Import/Export Settings*. This, you can enter the list of server connections with all required user accounts, **save** it, and then **import** the file on other client machines. All settings are stored, except from the user passwords - for security reasons, the passwords are not kept. You will only have to enter them once after importing the server list.
{% hint style="info" %}
One concurrent connection to a server is maintained at a time to optimize the network traffic. For certain use cases, you may want to create multiple connections to the same server with different credentials (having different permission sets) without saving the passwords and ask each user to choose his profile and enter his password when starting his session. To ensure that no person uses previous user's session, there is an auto logout option after certain period of inactivity, which can be enabled in the application settings.
{% endhint %}
#### Connect to Macula Servers
To connect to a **remote server** via local or public **IP or hostname**, follow these steps.
1. Create a server connection
2. Choose the connection in the list
3. Click *Connect*
Click the *Connection* button in the upper panel to bring up the *Server Connections* dialog box.
Click the *+ Add server* button to create a new server connection and fill the connection parameters. Alternatively, choose *Edit* to adjust existing server connection settings.
The table below contains details about the available parameters.
| Setting | Description | Default value |
| ----------------- | -------------------------------------------------------------------------------------------------------- | ------------- |
| Server Title | User-defined server name | Server #N |
| Server IP Address | Local/Internet IP address or host name of the target server | localhost |
| Server Port | TCP port for remote connection | 60554 |
| Login method | Internal or external\* (OAuth 2.0) authentication. | Internal user |
| User Name | User account name for remote connection | admin |
| User Password | Password for the provided user profile provided | \[empty] |
| Domain name | AD/LDAP domain, if applicable | \[empty] |
| Multicast Mode | Accept multicast streams from the target server | Disabled |
| Merge Resources | Do not display the source server for accessed resources; shuffle server resources (for multiple servers) | Disabled |
\*Choose OAuth to log in using Google account, Apple ID, Microsoft ID, Okta, or other OAuth 2.0 authentication provider.
Click *Save* when you have finished. The server connection created will appear in the item list and Macula Monitor will attempt to establish the connection immediately. Click *Disconnect* if you do wish to start working with the target server later. Click the *Remove* button in the upper-right-hand corner to delete any existing server connection.
{% hint style="danger" %}
For you to be able to use the multicast mode, it must be enabled on the server side via Macula Console. Also, multicast traffic must be allowed on all the network equipment on the way from your server to the Macula Monitor.
{% endhint %}
#### Server Login
Select a server by clicking it in the connections’ and click *Connect* in order to (re-)establish a connection with the selected server. Server resources will automatically appear in the left hand panel.
{% hint style="info" %}
In the Application settings, it is possible to set up automatic logout after a certain period of **user inactivity**. If this setting is enabled, all the servers will be disconnected from if there is no user activity in the application interface; default inactivity period is 15 (fifteen) minutes.
Also, for enhanced security: in the admin tool, you can disable the *Remember password* option, forcing users to **enter the password** when they connect to any server **every time.**
{% endhint %}
If you chose not to store the **password**, you will be asked for it every time you re-connect to the target server. In that dialog box, you will also have an option to change the user domain - you can use a domain that is different from the one used in the current Windows logon session.
{% hint style="danger" %}
When you do not see an option to remember the password, it means your administrator has disabled this functionality. In this case, you will have to re-enter the password every time.
{% endhint %}
If your user account does not have a privilege to log into Macula Monitor application without entering login reason, you will be also asked to provide a justification for this server session. The entered text will be logged in the server audit log. This is an additional security feature and it can be disabled by adding the corresponding user permission in Macula Console, under *Administration profile* in the user account settings.
Server policy of the Macula server may limit the number of **login attempts**. If you enter a **wrong password** more than the number of times specified by that policy, your user account will be **blocked**. Your system administrator can unlock the user account via Macula Console.
Click *Disconnect* in this same dialog box to log out from the selected server or click *Disconnect all* to log out from all servers.
#### Two-Factor Authentication
This application supports two-factor authentication as an additional security measure for the user login. It does not eliminate the necessity to enter the user password; instead, it serves as an additional security layer.
If the target server has two-factor authentication (2FA) policy enabled, you will be asked to confirm your identity by requesting and entering a code. Depending on the server configuration, the code may be requested by email or by SMS.
{% hint style="info" %}
2FA is configured by the Macula server administrator, so if you have any issues with requesting, receiving, or entering the code, contact the person who maintains the target Macula server. Provide the server administrator with your valid email and full phone number.
{% endhint %}
{% hint style="info" %}
The 2FA settings affect all users and all clients by default; the system administrator can set up exceptions for localhost connections and also for individual users.
{% endhint %}
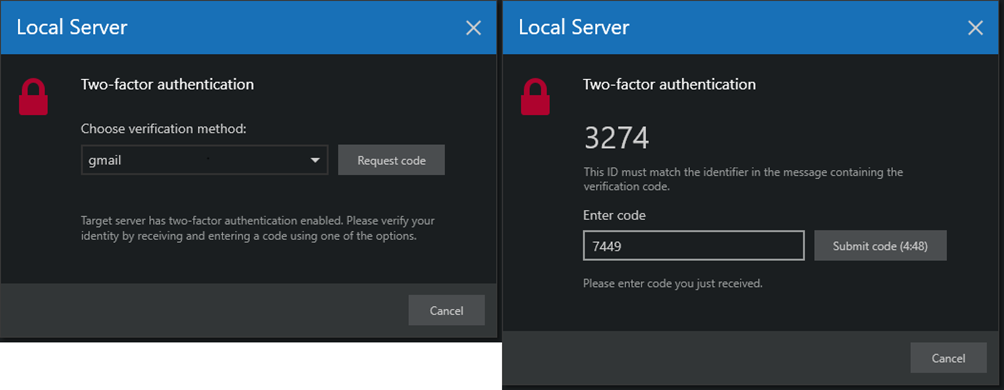
The login procedure with 2FA is as follows:
* an additional dialog box pops up upon the server connection attempt
* choose one of the provided verification methods and click *Request code*
* in the next dialog, you will see a session ID and an empty box
* check your email or phone (or other provided verification source) for a message with the same session ID (for example, marked as #3274 here) and copy the code from the message body (7449 here)
* click *Submit code*: if everything is OK, you will be logged in
The verified session will be active until you log out manually, close the Macula Monitor application, or your session expires after a period of inactivity. If the target Macula server disconnects for some reason, the session will be restored automatically, and you will not be asked to request the code again.
If you have **trouble receiving the code,** please ask your Macula administrator to check the settings for you. Possible issues may be:
* your email/phone number is not specified in the system or it is incorrect
* the automatic email is filtered - check your Spam folder
* your phone has a spam filtering app
* make sure you are entering the code itself, not the session ID
You have a limited time interval to enter the code. When the code expires, you will need to request a new one. Your system administrator can adjust the code validity period.
#### Log In Using OAuth (External Authentication Providers)
When connecting via Macula Monitor, there is an option to choose external authentication - Google, Apple ID, Microsoft, Okta, or other - instead of the regular user account.
To do so, choose OAuth 2.0 as the authorization method and save the settings. You can also choose to Remember the login so that the application does not ask for authorization again during the same session (session time is defined in Macula Console by the software administrator) if you disconnect from the server and try re-connecting. For instance, the session may be set equal to the operators' shift.
When you try connecting to the server, you will be offered to choose the authentication provider if there are multiple available. Choose whichever you like and click Proceed: A Web browser page will open automatically, asking you to enter the user credentials. If you have already logged into the server using this method earlier from the same PC, the success message will appear immediately. For some providers, you may have to confirm that the application requesting the authorization is safe.
Return to the Macula Monitor app.
If this is the first time you log in with the current user account, you will be asked to enter the security token.
{% hint style="info" %}
If you want to change the user to a different OAuth user, deselect the *Remember me* option in the server settings, disconnect from the server and try connecting again.
{% endhint %}
Server Grouping Options
To make it easier to navigate in multi-server setups, we added the Server Grouping option to Macula Monitor version 1.25. It is now possible to group servers inside Macula Monitor by adding or removing a server without additional settings in Macula Console.
1. To Add a server to the group - go to Macula Monitor and click on the *Connection* tab in the top panel.
2. In the *Connections* window, select the *Server* you want to add to the group and click the *Assign to Group* button.
3. Select an existing group from the dropdown menu and click the OK button.
4. If no group exists or you want to create a *new server group* - select *New server group* from the dropdown menu, provide the *Server Group Name* in the respective field, and confirm with the *OK* button.
{% hint style="danger" %}
Worth noticing: If you select the existing server group from the dropdown menu and rename it in the *Server group name* field, you will add the Server to the server group, but it will change the existing *server group name*.
{% endhint %}
{% hint style="danger" %}
You can import Servers and Groups using *Import Application Settings (*Application menu -> Tools -> Import Settings). If the imported Server host matches the Server host that already exists on your local setup, your local setup will have priority, and after import, you will see your original Server. You can learn more about import and export Settings in Application Settings section.
{% endhint %}