# Two-Factor Authentication
Macula servers support two-factor authentication (2FA) for the Macula Console and Macula Monitor logins. It is disabled by default, and you can turn it ON via server policies. When 2FA is enabled, all users who want to connect to your Macula server and who are not an exception, will have to enter both their password and a code they receive. Thus, the users prove their identity not just by entering what they know (the password) but also what they have (the email or phone). By default, this policy affects all users; you can disable 2FA for individual users in their permissions.
{% hint style="info" %}
At this point, Macula 2FA supports code sending via **email** and **SMS**, and works for Macula Console and Macula Monitor login.
{% endhint %}
Terminology:
* **session**: an established connection between client and server once the user logs in
* **code**: a numeric code sent to the user's email
* **notification provider**: an SMTP server or a GSM modem that will relay the notification
The **recommended** course of action is: first, create a notification provider, then fill in all the settings, save, and then enable and test 2FA.
#### 2FA Settings
2FA is configured via server settings: in the *Configuration* section, choose *Servers* on the left, then double-click your server to open its properties. In case of a Macula Global system, make sure to open the central management server properties.
The following settings are available here:
| Setting | Description | Default Value |
| -------------------------------- | -------------------------------------------------------------------------------------------------------------------------------------------------------------------------------------------------------------- | --------------------- |
| Enable two-factor authentication | If selected, additional authentication will be required for server login | Disabled |
| Set up notification providers | Set up desired providers (using email servers or other means) that will be used for sending out authentication codes | \[button] |
| Session expiration time | During this time period, 2FA will not be requested again if a client was disconnected by server; after this time or after user-initiated disconnect, the user will have to use additional authentication again | 1 day |
| Code expiration time | The time period during which the sent code will be valid, starting from the code send out moment; after this time, the user will have to request another code | 00:05:00 (5 minutes) |
| Code generation interval | The minimum time interval between two consequent code requests; the user will be unable to request a code more frequently | 00:00:10 (10 seconds) |
| Skip for localhost connection | If enabled, 2FA will not be applied to localhost connection | Enabled |
| Subject | Message subject line, can consist of text and macros (via right-click) | {SESSION\_ID} |
| Body | Main message part, can consist of text and macros (via right-click) | {CODE} |
{% hint style="info" %}
Name your **notification providers** according to the used verification source (e.g., **Email**) so that the users understand where to look for the code.
{% endhint %}
{% hint style="info" %}
In the verification message, write some text in addition to the session ID and the code so that:
* The user understands which one is which
* The email does not go to Spam
{% endhint %}
When you try enabling 2FA, you will get a warning that you need to test 2FA before saving the configuration. This is necessary to ensure that all the settings are correct and 2FA actually works; otherwise, you or other user(s) may be unable to log into the system at some point. The 2FA verification will start once you click *OK* to save the settings and close the window.
Settings to be verified before enabling 2FA:
* make sure you have added a valid 2FA notification provider (SMTP server or modem)
* add a contact email/phone number for each user
* we recommend that you allow at least one administrative user account to log in without 2FA, or that you disable 2FA for localhost connections: this is to ensure that you do not lose access to the system if your 2FA notification provider fails or becomes unavailable
You can configure 2FA without enabling it, verify these settings, and then finally enable 2FA.
The best approach for 2FA configuration:
1. In 2FA settings, add a notification provider and adjust everything but do not enable 2FA yet, click *OK* to save.
2. Make sure your email server or GSM modem used as a notification provider is valid, and that all users have correct emails/phone numbers in their account properties.
3. Go to 2FA settings again and enable it, then go through the verification.
When you **turn off** 2FA, you will have to go through the setting verification again next time you enable it. If you make changes to the 2FA settings and enable it at once, this test verification will use the previous settings for formatting and intervals (because it happens before saving the settings, and these will not be saved until you pass 2FA successfully).
Two-factor authentication is a recommended setting when you choose the highest cybersecurity level - the system will check if 2FA is enabled and remind you with a warning mark if it is not.
#### Set Up Notification Providers
You can set up one of multiple notification providers of each kind to give your users an alternative in case one of the providers does not work or is unacceptable for some reason.
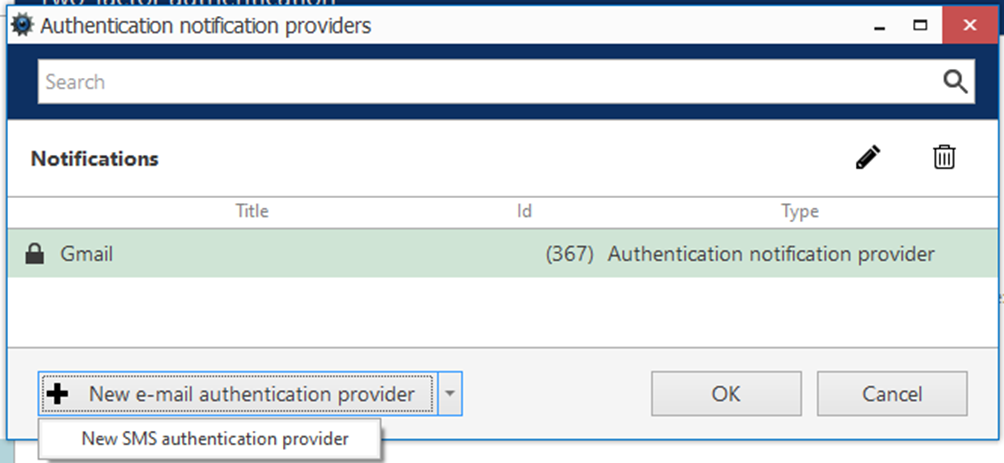
To add a new notification provider, click the corresponding button in the 2FA settings. In the dialog box, you will see the list of existing providers (none exist by default). Click the *+ New\..* button in the bottom or use the drop-down arrow to see all options.
For each provider, specify:
* **Title**: name that will be shown to the user (so make sure to include the communication means, e.g., Email via Office 365)
* **Mail server**: for e-mail notification providers, choose one of the pre-configured SMTP servers
* **GSM modem**: for messages, choose one of the pre-configured modems
If you have no pre-configured means of notification delivery, add them, and then return to this screen.
Click *OK* to save the provider, then click *OK* to go back to 2FA settings. All created providers will be shown to the user when they try logging in.
{% hint style="info" %}
Tip: if some of your notification providers do not work temporarily, add a corresponding note to the provider name. Thus, you will not have to remove it from the configuration but the users will know that they cannot use it for 2FA.
{% endhint %}
To edit an existing provider, use the pencil button on the top panel; to remove any of the items, select it and then click the *Recycle bin* button. Removed providers will be erased from the list, but the related email servers & modems will be preserved.