# Recording Profiles, Schedules, and Configurations
This section describes how to create and configure recording entities: recording profiles, schedules, and configuration.
To access recording configuration dialog boxes in Macula Console, select the *Configuration* section and choose *Recording* in the menu on the left.
There are three types of resources in the *Recording* tab:
* **profile**: choose what data streams are recorded and in what mode (continuous/alert triggered)
* **schedule**: set a recording timetable based on profiles
* **configuration:** a profile- or schedule-based recording configuration that is assigned to channels
These entities are not related to storages
The buttons on the upper panel give the option to create, edit and remove recording resources.
{% hint style="danger" %}
Recording resource cannot be deleted if it is currently in use, i.e., when a recording profile is assigned to a recording configuration or a schedule, or when any of the recording resources are assigned to a channel.
{% endhint %}
#### Create Recording Profile
Recording profiles allow users to set which data streams are recorded and how. Profiles cannot be assigned directly to devices; instead, they are used as components for recording schedules and recording configurations. For this reason, profiles do not include settings like pre-recording interval: this setting is defined separately for each channel and, consequently, is defined in the recording configuration settings.
To add a new recording profile, click the down arrow button next to *+ New recording configuration* and select *+ New recording profile*. The profile creation dialog box will appear.
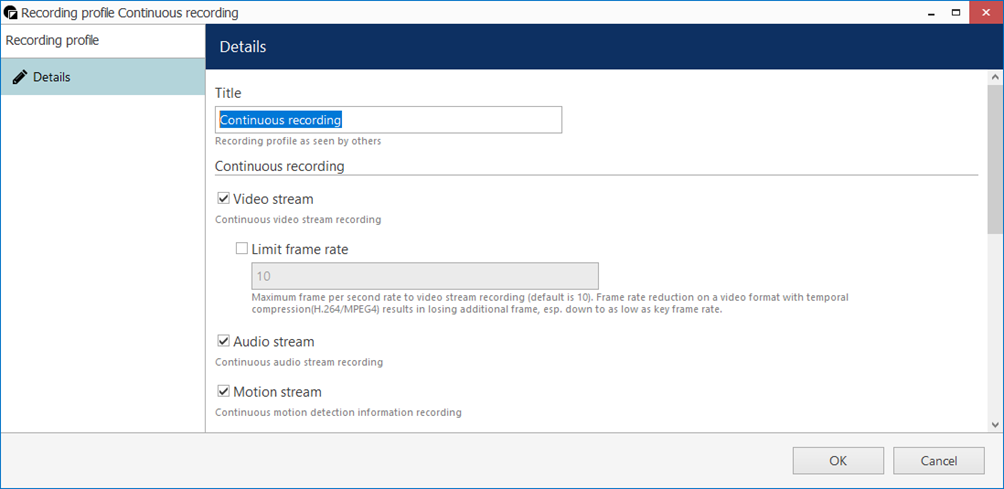
This dialog box has two sections: one for continuous and one event-driven recording. Note that you can only select one mode at any time for video and audio streams: if continuous recording is selected, alert-based recording options will be grayed out.
You can use the existing built-in recording profiles as the basis when creating your own recording profiles. Also, the most popular scenarios (motion-based, continuous, no recording) are covered by the built-in profiles so you only need to create custom profiles.
To configure **motion-based recording**, enable *Video stream* in the *Alert recording* section and enable the *Detected motion triggers alert* setting. If you wish to record **still frames** at a low rate while there is no motion taking place, keep the *Video stream* option in the *Continuous recording* section enabled and set your desired frame rate, e.g., 1FPS; then set either a high FPS or unlimited FPS in the *Alert recording* section. In case you only wish to record while motion is taking place, deselect *Video stream* in the *Continuous recording* section.
{% hint style="info" %}
When you assign a **motion-based recording configuration** to a channel with a disabled motion detector, the software will automatically suggest enabling motion detection for the target channel. The camera-side detector is given priority; if it is not available, the software-side detector will be enabled and set to the high-performance mode. We recommend that you **review** the motion detector settings to make sure it operates as desired, especially if the camera-side detector is in use.
{% endhint %}
| Setting | Description | Default Value |
| ------------------------------------------------- | -------------------------------------------------------------------------------------------------------------------------------------------------------------------------- | ------------- |
| Title | User-defined recording profile name | \[empty] |
| Video stream (continuous) | Select to enable continuous video recording | Disabled |
| Limit frame rate (for continuous video recording) | Set a frame rate restriction for recorded video; note that for compressed video streams (e.g., H.264) actual frame rate may differ due to compression algorithms | 10 FPS |
| Audio stream (continuous) | Select to enable continuous audio recording | Disabled |
| Data stream | Select to enable data recording from the associated the data source | Disabled |
| VCA stream | Select to enable continuous video analytics event recording | Disabled |
| Video stream (alert) | Select to enable alert-driven video recording; video will only be recorded after alert generation, for the time period defined in the *Post-recording interval* | Disabled |
| Limit frame rate (for alert video recording) | Set frame rate restriction for recorded video; note that for compressed video streams (e.g., H.264) actual frame rate may differ due to compression algorithms | 10 FPS |
| Audio stream (alert) | Select to enable alert-driven audio recording; the video will only be recorded after the alert generation, during the time period defined in the *Post-recording interval* | Disabled |
| Post-recording interval | The time interval during which alert-driven recording will be conducted after alert generation | 10 seconds |
| Detected motion triggers alert | Motion will act as a trigger for recording; enable this setting to set up motion-based recording | Disabled |
When done, click *OK* to save the recording profile: it will appear in the item list of the *Recording* section. The profile is now ready to be used for further configuration.
#### Create Recording Schedules
Recording schedules are **sets of recording profiles** that define what recording profiles are used depending on the day and time of the week. In other words, a schedule defines how the profiles are switched over time basis. Alike recording profiles, schedules need a recording configuration on top of them to serve as a proxy in order to be assigned to channels.
To add a new recording schedule, click the down arrow button next to *+ New recording configuration* and select *+ New recording schedule*. A schedule creation dialog box will appear, allowing you to enter a name of your choice for the new schedule and add the profiles to define the recording timetable.
To create a new schedule:
1. Enter its title
2. Choose a calendar (optional) or just use a weekly schedule
3. Define the points in time when the profiles will change (using either grid or list view)
4. Save the schedule
Here are detailed explanations of what the schedule elements do and how they are configured.
#### Schedule Visualization
The schedule configurator has two modes: list view and grid (graphical) view. The graphical mode is used by default; you can switch between the two views by clicking the toggle button in the upper right corner.
#### List Mode
*In this view, each line represents a point in time when a specific profile is activated.*
Click the *Add* button below to insert a new profile with a defined start time. To change an existing item in the list, double-click it or use the *Edit* button.
Note that only begin time is set for each added profile: the end time is determined by the start time of the next profile. For example, if you require continuous recording during weekdays and motion-driven recording during weekends, your continuous recording profile should be scheduled to start on Monday at 12 a.m. and motion-driven one - on Saturday at 12 a.m..
Click *OK* to save and add the profile to the schedule. Multiple profiles will be automatically sorted based on their start time.
Use the *Edit* and *Remove* buttons below to manage the profiles added. When you are finished, click *OK* to save; the newly created schedule will be added to the item list in the *Recording* section.
#### Grid Mode
Graphical schedule view is more convenient for complex timetables, where many different recording profiles or profile combinations are used.
Simply select the desired profile in the list on the left, then mark the target period on the grid view. Repeat with all desired profiles.
As you create new profiles, they are automatically assigned different colors and appear in the profile list.
{% hint style="info" %}
As you create new profiles, they are automatically assigned different colors and appear in the profile list.
{% endhint %}
{% hint style="info" %}
It is not necessary to fill the whole timetable. You can leave some of the grid empty (white): empty time periods will be analogous to the *No recording* profile and nothing will be recorded during that time.
{% endhint %}
#### Schedule Calendars
The core of a regular recording schedule is the **week.** In the simplest approach, you define how the profiles are switched on a weekly basis by coloring the week grid, and your Macula server will cycle through the week accordingly.
A more detailed approach takes into account the **whole year**. This covers non-standard weeks, when some of the weekdays should follow the recording pattern of the weekends (e.g., state holidays) or vice versa. For this, you can build a **custom calendar** with exceptions.
How to decide if you need a calendar?
* If you only need a typical weekly schedule throughout the year, use the weekly schedule.
* If you have a need for custom daily schedules, use a custom calendar.
* If you need to change the day type sometimes and "change Saturday into Thursday", use a custom calendar.
When you only use the regular 7-day week without a calendar, ignore the "Custom days" section.
#### Add Custom Calendars
User-defined calendars provide an option to define a yearly basis for the recording. While the weekly basis is simpler, having a year long calendar allows configuring special dates (e.g., holidays).
Each calendar assumes the same **weekly schedule** as its base, and then you can add exceptions by explicitly assigning the recording pattern to specific dates. You can choose that pattern from the weekly schedule (7 different days) or from the custom days (5 additional daily patterns), which you can pre-define.
You can add as many calendars as you like, use them in various recording configurations, and change them by adding/removing items at any point. When you change the day type for the current day (e.g., today is Saturday and you add a calendar entry that forces Thursday on this date), the new recording profiles are enforced immediately after you save the configuration.
To add a new calendar, open the recording schedule creation dialog box, and click *Change...* next to the *User-defined calendar* option. You will see the list of existing calendars (empty by default). Click the *+ New user-defined calendar* button to open the dialog window.
In the list of calendars, you can also edit the list (remove unnecessary items by clicking the *Recycle Bin* button) and open existing calendars for editing (by selecting the target calendar and then clicking the *Pencil* button).
{% hint style="info" %}
If you run multiple installations in locations that use the same calendar, you don't have to create it again for every installation. Simply create the calendar, save the Macula configuration database file, and then import the calendar from it.
{% endhint %}
Enter the calendar name and switch to the *Days* tab. It is empty by default (which means the calendar solely operates on the normal week basis). To create exceptions:
1. Click the *+ Add* button.
2. Choose the date.
3. Assign the day for that date.
4. Click *OK* to add the special day.
Repeat this process until you have entered all the desired custom calendar days. Click *OK* to save and close the dialog box: the calendar will appear in the calendar list, allowing you to assign it to your recording schedule.
In the list of days, click any entry and then click the *Pencil* icon to open it for editing.
#### Custom Days
Apart from the weekdays and weekends, you can define up to five additional alternative days and use them in your custom calendars. This feature is convenient when there are days when no daily recording pattern can be applied, e.g., early release pre-holiday days or other days with a special schedule.
Custom days do not participate in the regular weekly schedule (without a calendar). You can assign any custom day to a particular date in your user-defined calendars.
#### Create Recording Configuration
Recording configurations are global recording arrangements that can be assigned to a per-channel recording setup. Recording configurations can be based on a single recording profile or on a pre-defined recording schedule.
To add a new configuration, click the down arrow button next to *+ New recording configuration.*
The corresponding dialog box will then appear, allowing you to enter the configuration properties.
| Setting | Description | Default Value |
| ---------------------- | -------------------------------------------------------------------------------------------------------------------------------------------------------------------------------------------------------------------------------------------- | ------------- |
| Title | User-defined recording configuration name | \[empty] |
| Controlled by | Choose existing recording profile or schedule for current configuration or create a new one from the sub-dialog | \[none] |
| Pre-recording interval | Set the pre-recording interval for alert-driven recording, if applicable; note that large pre-recording interval will increase virtual memory usage - if the used profile is not alert or motion driven, set 0 here to decrease memory usage | 10 seconds |
| Amount quota | Storage quota in GB: the maximum amount of space that can be taken up by recordings, if the maximum size is reached, the oldest footage will be deleted; set 0 to disable any limitations | 0 (unlimited) |
| Duration quota | Duration quota in days: the maximum number of days that recordings are kept in the archive; after this, recordings will be erased; set 0 to disable any limitations | 0 (unlimited) |
Before setting recording limitations, make sure there is sufficient space in the server storage for all cameras. The quotas may be ignored if actual storage size is insufficient, and this will result in shorter footage durations.
Note that maximum the **pre-recording** time is 60 seconds. Larger values will be ignored by server core. Also, actual pre-recording buffer may be smaller if the server detects that it is not required (see below). The **actual buffer size** in seconds will be displayed in the *Monitoring* section, under *Streams*. It may differ from your prerecording setting in the recording configuration. Macula server applies smart logic here and traces situations when larger buffer is not necessary, or even preventing the system from normal operation. Thus:
* if the currently used recording profile does not involve any pre-recording (e.g., *Continuous recording*, or event-driven with no defined E\&A events), the buffer size will be reduced to 0 - this is absolutely normal, once you add any recording-triggering events, Macula will automatically increase the buffer size
* if there is not enough memory for all channels (the server is overloaded), the server will reduce prerecording buffers; channels with largest frame cache size will have their buffers reduces first of all upon server startup, the buffer size is increased gradually for smoother start
If your pre-recording buffer size requires more memory than there available, you will see channels with top buffer size (in MB) appear marked red and with an \* (asterisk) in the *Monitoring* section, under *Streams.* Also, the *Audit* section of Macula Console will contain events from the corresponding server stating that there is *Not enough memory to process frames*. If this happens regularly, review your server hardware using GSF provided hardware calculator and add more RAM to your server, or decrease the pre-recording interval duration wherever possible
{% hint style="info" %}
Note that quotas do **not** give priority to channels that are assigned configuration. For example, if you set the duration quota to ten days, it merely means that the maximum recording duration will be ten days for a channel with given configuration; this will **not** reduce recording duration for other channels.
{% endhint %}
{% hint style="info" %}
For security reasons, it has been made impossible to erase recordings from individual channels and/or time periods, so that archive integrity is preserved. Recordings are erased automatically when storage or duration quota is reached; if you need to erase footage from an existing channel, simply assign a recording configuration with an individual quota to it, wait until the footage is erased (actual timing depends on archive size) and assign a new recording configuration.
{% endhint %}
When you have finished, click *OK* to save and exit. Recording configuration will now be added to the item list and will become available in channel recording configuration.