# Archive Replication
In addition to the main recording configuration, each channel has an extra feature for the backup recording, which is called channel replication. The basic idea is that a channel copy - or replica - is created and can be set for recording on any server with a different recording profile and/or schedule. These kinds of channels have configuration constraints - e.g., you cannot change stream resolution - so it is only possible to affect recording settings by choosing a different recording profile and/or schedule.
The backup channel is not recorded directly from the data source; instead, it is being replicated from the original recording that already exists on the server. This results in two important points:
* replication channel cannot contain more data than the original stream,
* replication feature is resistant to low bandwidth and connection failures.
For instance, if primary stream recording profile is set to record video only at 15FPS and based on motion, then, consequently, replication stream cannot be full-time video+audio at 25FPS due to a lack of data. Keep this in mind when configuring replication.
{% hint style="info" %}
If you create replication channels after the main channels have been recording for some time, the replicas will copy the last **thirty days** of the existing archive and the server-specific and individual quotas will be maintained from then on.
{% endhint %}
You can configure replication channels to be recorded on the same server as the source channel or on any other available server; if system architecture is distributed, especially on large-scale multi-site installations, dedicated **replication servers** are recommended. These are regular recording servers with only replication channels assigned to them.
When the **failover** mechanism is in action:
* If the source server (containing the original device aka replication source) is replaced by a failover node, and the replica is on another server (which is functioning normally), the replication process will continue as usual, provided that connection between the failover node and replication server is available.
* If the replication server goes offline and is replaced by a failover node, the replicas will pause and will not run on the failover server. Hence, you will not have an excessive archive copy. The replication process will resume once the target replication server is back. Thus:
* It is not necessary to put pure (dedicated) replication servers into failover clusters, and
* If a server has both normal devices and replicas, only regular devices will be covered by failover.
If replication is done from multiple servers (e.g., failover servers kicked in, or the source device was manually transferred to another server), you will see separate tracks in the playback mode of Macula Monitor. To view them all together, enable summary timeline in the application settings, and then drag and drop all tracks onto the viewing area.
{% hint style="danger" %}
If the replicated device is not assigned to any server - device will not work until it is assigned to the corresponding server. You can assign device to the server one-by-one, or selecting and editing multiple devices in a bulk.
{% endhint %}
{% hint style="info" %}
Any number of replication channels can be created for each channel; both main stream and substream are available for recording in the replication channel settings.
{% endhint %}
{% hint style="info" %}
Replicas are not subject to licensing; e.g., if your Macula license allows 100 channels, you can create any number of channel replications for each of these 100 channels. The feature itself is only available for Macula Enterprise edition.
{% endhint %}
#### File-by-File Replication
When creating a replication channel, users now have the option to select File-by-File Replication. This mode offers distinct advantages and limitations compared to traditional replication:
1. Speed: File-by-file replication operates faster than standard replication but with a slight lag since only closed files are copied.
2. No Alert-Based Replication: This mode replicates whole files only; alert-based replication is unsupported.
3. Mode Switching: Switching between replication modes is not available. To switch from regular replication to file-by-file, create a new replication channel and delete the existing one.
4. Data Integrity Handling:
1. If source data contains errors, it is skipped temporarily and added to a review queue.
2. On startup, the replication process reviews the last MDAT file(s) for integrity. If issues are detected (e.g., due to an unexpected shutdown), it re-copies the previous portion to maintain data consistency.
5. Audit Warnings:
1. An audit warning will appear if the download speed is lower than the recording speed.
2. A critical event will be logged if storage is unavailable.
6. Automatic Pausing:
1. Replication pauses if storage is partially unavailable to prevent duplicate data cycles when the storage is back online.
2. To safely eject a storage disk, it must first be removed from the storage configuration.
{% hint style="danger" %}
Files are considered identical if they have matching names, start times, and end times. If any part of the file (e.g., beginning or end) is altered, replication will create a new copy, resulting in doubled data but ensuring correct playback.
{% endhint %}
#### Pre-Configure Recording Profiles
Prior to creating a replication, make sure you have arranged the necessary recording profiles and schedules and assigned them to recording configurations. A typical replication recording configuration may include low frame rate and recording during critical hours, and also may have a longer duration quota.
{% hint style="info" %}
A valid replication scenario could be as follows: the main stream is recorded continuously at 30FPS with audio and all available event data streams; primary replication channel has 10FPS, video+audio settings and secondary replication channel represents video at 15FPS with digital input events data.
{% endhint %}
#### Create Replication
The *Create replication* button is available on the upper panel in the *Channel* view, which can be accessed in two ways:
* choose the *Configuration* section and then click *Channels* in the left Macula Console menu - this view contains all available channels and channels groups;
* while in *Devices*, click *View channels* button on the upper panel - this view will only display device-specific channels.
Select one or multiple channels in the list, then click the *Create replication* button on the top panel. A small dialog box will appear, allowing you to set the destination server and recording configuration for the replication at once. You can change these settings anytime later by going to the **device and channel** **settings** as described below.
The created replication channel will appear right next to the original channel in the full channel list (note that it may not be visible in a single-channel view or when specific filters are active). All channel settings will be duplicated, the channel name will receive a *\[Replication]* tag and the device model will be set to *Generic \[Replication]* type (which is unchangeable).
You can change the settings of any replica similarly to regular devices and channels
#### Device Settings
To change the settings of a replication device, go to *Configuration* section and then click on *Devices* in the menu on the left. On the bottom panel, select *Replication* filter to display replication devices only (the active filter is highlighted blue; to deactivate it, click highlighted filter once again).
Select one or multiple devices (hold down *CTRL* or *Shift* to select several items at once) and click the *Assign server* button on the upper panel, then select the target server from the pop-up dialog box and click *OK* to save.
Double-click on any device or click the *Edit* button on the bottom panel to open device editing dialog box and change permissions and membership settings.
#### Channel Settings
Switch to *Channels* section; on the bottom panel, select *Replication* filter to display replication channels only. Click each individual channel to open its configuration dialog box and assign recording configuration, and set Organization attachments, if desired. Membership and user privileges can be set on the corresponding tabs, just as for usual channels.
{% hint style="info" %}
You can delete replication channels and devices just as any usual channels/devices. Note that source channels cannot be deleted until there exists at least one channel exists to replicates them.
{% endhint %}
If all the steps above have been completed successfully, your devices will now have backup recording configured. Archive recorded from replication channels can be played back in the same way as regular archive via Macula Monitor. Live previews are not available as replication only provides recording.
#### Smart Replication
After creating the replicated channel, you can also enable the **Smart replication** feature. This feature allows the replication of only those parts of the stream that have attached events. To set this feature, you need to:
1. Go to *Configuration -> Channels ->* **Your replicated channel**.
2. Click the *Edit* button on the top of the *Channels* subsection or double-click **Your replicated channel**.
3. Inside the left subsection of the pop-up window, Locate the *Replication* tab.
4. At the top of the *Replication* subsection, mark the *Enable smart replication* checkbox.
5. New input fields will appear:
1. *Prerecording interval* - The length of the video to save before the alert, in seconds.
2. *Post-recording interval* - The length of the video to save after the alert, in seconds.
3. *Maximum number* *of alert events* - Maximum allowed alert number in the queue if replication target is not available at the moment. New *Alerts* will not be added to the queue if limit is filled.
6. Set your pre- and post-recording intervals and confirm your input with the *Apply* and *OK* buttons.
After enabling *Smart replication*, you can go to the *Events & Actions* and create an *Alert* action for the replicated channel.
{% hint style="danger" %}
Make sure the replicated channel *Recording profile* is set to a *Continuous recording*.
{% endhint %}
{% hint style="danger" %}
Make sure that the source channel recording profile covers alert intervals. If there are no records in the source channel, there will be nothing to replicate, even if the attached event triggers an alert in the replicated channel.
{% endhint %}
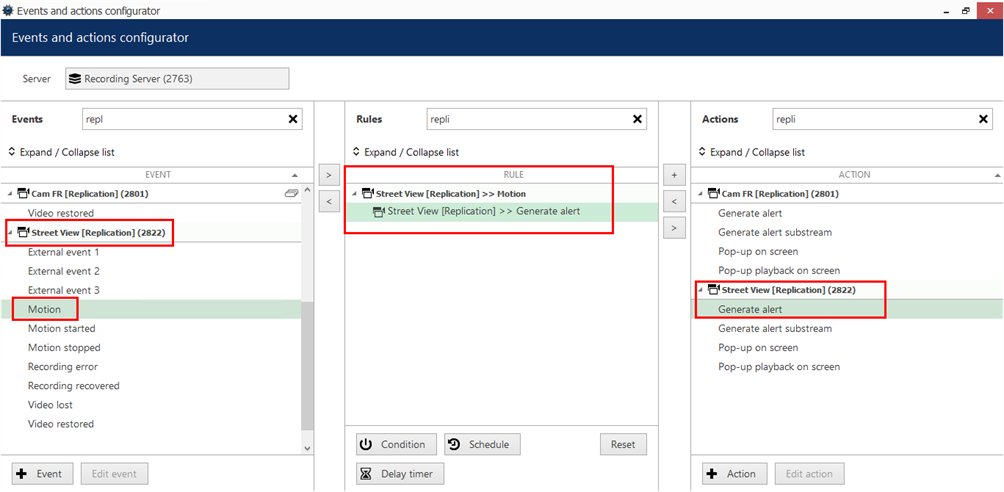
Replication Events
To set replication events - go to:
1. *Events & Actions -> Rules*
2. On the top of the *Rules* subsection, select the server and then click the *Open Configurator* button. This will bring the *Events & Actions configurator* pop-up window.
3. Inside the *Events* subsection of the configurator, find your replicated channel and select the corresponding *Event* from the list.
4. After adding The *Event*, find the *Generate alert* action inside the *Actions* subsection for the corresponding channel and add it to the *Rule*.
5. Confirm your setup with the *OK* button.
Now, you are ready to replicate the channel based on the corresponding events.