# Live View Section
Click the *Live* tab on the upper panel in order to switch to live video monitoring.
The panel on the left displays resources from connected servers: layout templates, layouts, channels, maps and user buttons loaded from configured servers.
* **Search**: global resource search
* **Layouts and layout templates**
* Local resources: stored on Macula Monitor machine
* Server resources: loaded from connected server(s)
* **Channels**: per server or mixed, if the *Merge resources* option has been enabled in server connection properties
* **Webpages**: a particular case of a channel (set up via Macula Console by selecting the\
corresponding device model)
* **Maps\***
* **User Buttons\***
* **Webpages**\*\*: interactive webpages
\*Some resources may be unavailable for certain software editions.
\*\*This type of resource requires an additional license.
Depending on the resource type, you may be able to click and/or drag items. See the relevant sections of this manual for detailed information on how to use and manage each of these resources.
From the *Layouts* menu on the left, select your desired layout template and then drag and drop it into the viewing area. Next, drag and drop channels from your desired server to the empty slots, using the *Channels* menu section on the left. Layout templates can be selected either from default local templates or from server layout templates. The latter can be created on the specified server via the Macula Console management application.
You can save the current layout using the *Save layout* button in the upper-right-hand corner; it will become available in the layout list on the left under the target server name. Right next to it, there is a button that can be used to auto-detect displays, which is especially useful in multi-monitor systems.
Drag and drop or double-click a channel to place it onto the layout template (double-click works for the primary window). Channels having no video stream (e.g., camera offline) are marked with red in the *Channels* section of the *Resources* list.
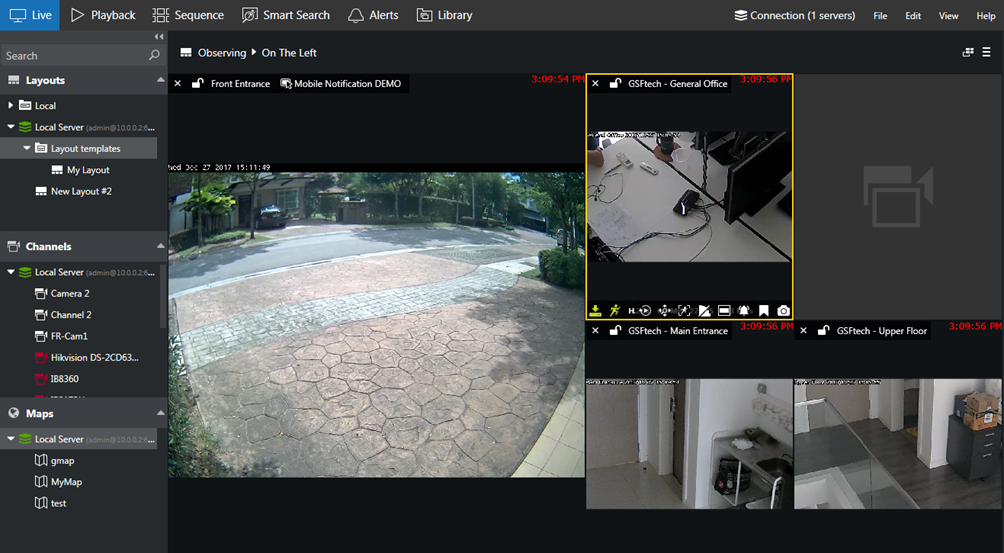
Channel name is displayed in the top left corner of each viewport; the current server time will appear in the upper-right-hand corner.
Click any live view to bring up additional channel-specific parameters and quick controls. Overlay preferences can be changed via Application settings. By default, these are:
* Upper-left: general viewport controls
* **X** - close live stream and free viewport - available with or without viewport selection
* viewport **lock status**: unlocked (default) or locked; unlocked means that the viewport can be used for map/camera pop-up
* **camera name**
* user button, if assigned
* Upper-right: current time, according to the selected time presentation (server, client or UTC); you can change it via main menu *View >> Time presentation*
* Lower-left: **stream details**
* recording status: X = not recording, yellow arrow = recording
* motion detector status: running = motion present, standing still = no motion detected
* video codec of the stream
* picture resolution, abbreviated
* stream frame rate, FPS
* stream bitrate, KBytes/s or MBytes/s
* Lower-right: **controls**; enabled items are highlighted yellow
* instant playback (not available if there are no recordings)
* PTZ toggle: PTZ HUD and bottom panel ON/OFF
* DPTZ toggle
* motion grid ON/OFF
* incoming audio ON/OFF (if enabled and supported by camera/software integration)
* audio OUT: press and hold the microphone to speak (control is present only if the feature supported by camera/software integration)
* substream: auto/main/substream
* aspect ratio (auto/stretch to fill viewport/original)
* notification panel toggle
* snapshot export to library
* Bottom: PTZ controls
* Presets
* Tours
* HUD (Heads Up Display) ON/OFF
* Centre: PTZ HUD controls
* Pan and tilt arrows
* Zoom slider
* Iris slider
* Focus slider
Webpages have their own set of controls.
The upper-right-hand corner of live view section contains controls for multimonitor and video wall setup.
On the right side of the application window, there is the alarm pane, which displays the arriving bookmark alarms.
* If the pane is hidden, enable it via Application settings: *Usability* > *Show alarm pane*
* Contained alarms are generated by connected servers (action: create bookmark) and must therefore be pre-configured by the system administrator