> For the complete documentation index, see [llms.txt](https://gsfcorp.gitbook.io/macula/llms.txt). Markdown versions of documentation pages are available by appending `.md` to page URLs; this page is available as [Markdown](https://gsfcorp.gitbook.io/macula/monitor-guide-v1.33.0/case-export.md).
# Case Export
Macula Monitor offers a specialized feature called *Case Export*, which allows asynchronous video export with adjustable time intervals. By exporting cases instead of regular archive, you create a "story" video from all the available channels, with different intervals. For example, exporting evidence of a person running across multiple streets as a case may be preferable over regular (synchronous) export because it will save time for the person watching the footage.
Case export is a two-step process:
1. Case creation
2 Video export
#### Creating Cases
A case is a set of video archive intervals. which can be exported as a single video file. At the case creation stage, you choose the video channels and the corresponding time intervals for each one. From each channel, multiple entries can be added.
Example: for the abovementioned scenario with the running person, you can add the archive from multiple cameras and limit each channel's output to the time when the person was visible in the frame.
{% hint style="info" %}
Any user with *Playback* access rights can create a case for the export.
{% endhint %}
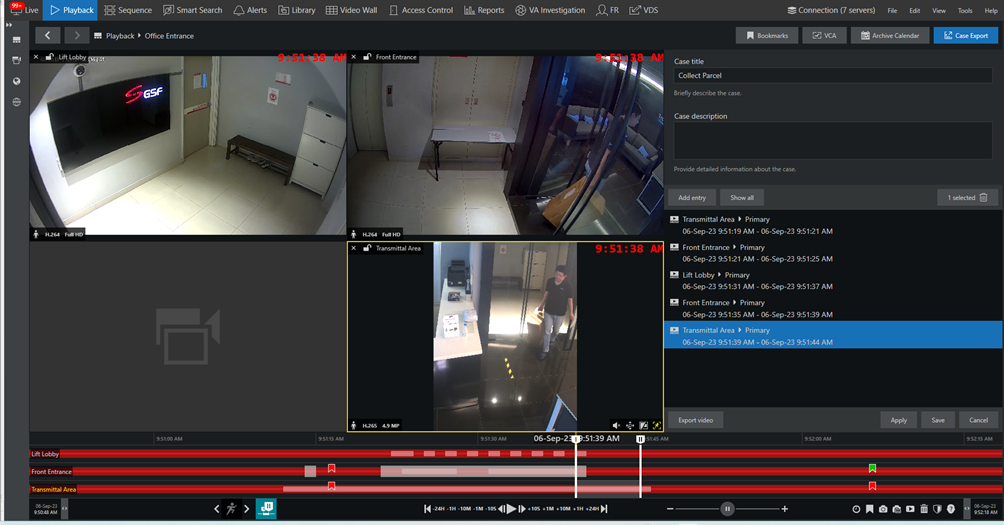
To create a new video export case in Macula Monitor, go to the *Playback* tab and press the *Case Export* button in the upper right corner to bring up the case export panel. Then follow these steps:
1. Press the +*Create* button, then fill in the *Case Title* and *Case Description*
2. Drag and drop the desired channel onto the viewing area
3. Select a channel by clicking it in the viewport
4. Press the *Add entry* button in the *Case Export* panel
5. Adjust the time interval by dragging the start and end markers on the timeline
6. Repeat steps 2-4 as many times as you need to compose the *Case*
7. Press the *Save* button at the bottom of the *Case Export* tab to save the case and go back to the case list
If you wish to discard the changes, click the Cancel button instead of saving the case. If you move across tabs, the currently edited case will be preserved. If you close the Macula Monitor application, the unsaved changes will be lost.
*If you need to add different time intervals from the same channel, press the Add Entry button while the channel is selected in the viewport and set the time interval you want to add.*
When you add **data channels** that have associated video channels (set up as channel members in Macula Console), these video channels are also added to the entry list; thus, by default, the video is exported along with the data. If you only need to export the data without video, unmark the *Include related channels* checkbox.
You can **edit** the case at any time later by returning to the list of cases in the *Case Export* panel. To add new video intervals to already saved cases, go to:
1. Open a case from the *Case Export* panel either by double-clicking it or by selecting it and clicking the *Edit* button
2. Add another video interval as explained in the steps 3-5 above
3. Press the *Apply* or *OK* button to save the changes.
Each channel may participate in the export multiple times with different portions of the video archive.
#### Video Export Using Cases
Cases can be reviewed in the Macula Monitor software and exported in common video file formats for easier playback by third parties.
To export any case as a video file:
1. Select a case from the *Case Export* panel.
2. Press the *Export Video* button at the bottom of the *Case Export* panel: the export job will be created automatically.
3. Go to the *Library* tab to see the export status, open the resulting file, and/or transfer it to the removable media.
{% hint style="danger" %}
The controller device should be DirectShow compatible in order to be recognized in Macula Monitor.
{% endhint %}
{% hint style="info" %}
After you press the *Export Video* button, there will be no visual indication except the red notification circle over the *Library* tab.
*Video Export* may take some time to process; you will find the progress indicator in the STATUS column. Wait until it reaches100% before opening the exported video file.\
If your user account has insufficient permissions to export the video, the attempt still will be visible in the *Library*, but the status will be *Access is denied.*
{% endhint %}