> For the complete documentation index, see [llms.txt](https://gsfcorp.gitbook.io/macula/llms.txt). Markdown versions of documentation pages are available by appending `.md` to page URLs; this page is available as [Markdown](https://gsfcorp.gitbook.io/macula/monitor-guide-v1.33.0/application-settings.md).

# Application Settings

Macula Monitor settings let you define the appearance and behavior of the application, as well as pre-define some defaults, such as video and snapshot export defaults.

Application settings are reachable via the main menu by clicking *Edit* -> *Settings,* and these cover all configurable options of the program GUI. Note that parameters here are defined for the whole application and cannot be set separately for application instances and/or individual layouts, channels etc.

These settings can be saved into a separate configuration file and later imported in any other Macula Monitor application, including application instances on other workstations. The export/import procedure is described at the end of this topic.

#### General

General settings like the application language, automatic logout, exclusivity mode parameters etc. can be found here.

<figure><img src="https://412599993-files.gitbook.io/~/files/v0/b/gitbook-x-prod.appspot.com/o/spaces%2FeNXnJx0OpvxnmpWqOBNm%2Fuploads%2FpcK9hZ4CjmgbsJ5vg1e6%2Fimage.png?alt=media&amp;token=e1e5de0a-c946-4b30-ae46-ad3339c6597e" alt=""><figcaption></figcaption></figure>

The table below contains a detailed description for each setting.

| Setting                                   | Description                                                                                                                                                                                                  | Default Value                                        |
| ----------------------------------------- | ------------------------------------------------------------------------------------------------------------------------------------------------------------------------------------------------------------ | ---------------------------------------------------- |
| Language                                  | Choose language for the application interface from the list of available localizations (requires application restart); will only affect the Macula Monitor application                                       | Language set during installation, English by default |
| Application startup mode                  | Enable the application to be started in the specified mode (locked/exclusive/both/none); regular = no special mode                                                                                           | Regular                                              |
| Interactive user idleness action          | Override or allow OS screensaver                                                                                                                                                                             | System Settings                                      |
| Auto logout after user inactivity         | If enabled, all the servers will be automatically disconnected after a certain period of user idleness                                                                                                       | Disabled                                             |
| User idleness timeout                     | Time period in seconds, after which the auto logout will be executed                                                                                                                                         | 15 minutes                                           |
| Pop up message box upon server disconnect | If enabled, you will get a floating message box with details every time a server is disconnected                                                                                                             | Disabled                                             |
| Exclusive mode\*                          | Defines if exclusivity mode is applied to all monitors or currently opened application instances only                                                                                                        | Opened screens only                                  |
| Exclusive mode password                   | User-defined password for unlocking exclusivity and locked application modes (You need to set the password before the system will allow you to turn on exclusivity mode)                                     | \[none]                                              |
| Enable watchdog                           | Turn ON application behaviour monitoring: Macula Monitor watchdog will restart the application if it freezes or hangs during operation or on startup (it is highly recommended to keep the watchdog enabled) | Enabled                                              |
| Show update notifications                 | Enable application update notifications from connected servers                                                                                                                                               | Enabled                                              |

\* Exclusivity mode settings:

* *All Monitors* mode will force fill all displays with child Macula Monitor application instances upon enabling exclusivity mode
* *Opened screens only* mode will still allow background application/OS access via displays where no Macula Monitor is launched

{% hint style="danger" %}
Important: Macula server and Macula Monitor application major versions must match. Example: Macula Monitor having version 1.3.0 will be unable to connect to servers having versions 1.5.0 or 1.15.0.

Maintenance versions within the same major version (e.g., 1.17.0 and 1.17.1) are compatible but we still recommend that you match the software versions exactly for best performance.
{% endhint %}

#### Navigating settings

You can simplify navigation through settings by using the search option. Locate the field with the magnification lens icon at the top-left side of the settings window.

<figure><img src="https://412599993-files.gitbook.io/~/files/v0/b/gitbook-x-prod.appspot.com/o/spaces%2FeNXnJx0OpvxnmpWqOBNm%2Fuploads%2F8kJFlGlFWgMl5p3ITK4W%2Fimage.png?alt=media&amp;token=a7d955ed-9002-472f-ac34-47731de25fff" alt=""><figcaption></figcaption></figure>

#### Usability

This section contains settings related to the application controls and interaction with the application elements: different playback modes, DPTZ etc.

| Setting                                                    | Description                                                                                                                                                                                                                                | Default Value                            |
| ---------------------------------------------------------- | ------------------------------------------------------------------------------------------------------------------------------------------------------------------------------------------------------------------------------------------ | ---------------------------------------- |
| Show tooltips                                              | Show hints when hovering over some element with the mouse cursor                                                                                                                                                                           | Enabled                                  |
| <p>Auto-expand</p><p>server nodes</p>                      | Automatically expand the contents of the connected servers in the resource tree                                                                                                                                                            | Enabled                                  |
| <p>Auto-expand</p><p>visual groups</p>                     | Automatically expand the contents of the existing visual groups in the resource tree                                                                                                                                                       | Disabled                                 |
| Show alarms pane                                           | Enable to bring up the alarm pane containing bookmark alarms from connected servers                                                                                                                                                        | Disabled                                 |
| Maintain original aspect ratio                             | Keep original picture proportions; when OFF, image will be stretched to fill in the viewport (this setting can be overridden for each individual viewport)                                                                                 | Disabled                                 |
| Pause decoding for background channels                     | If enabled, decoding for background channels will be terminated when one of the channels is maximised\*                                                                                                                                    | Disabled                                 |
| Pause data transmission for background channels            | If enabled, streaming will be paused for the rest of the channels when one channel is maximised\*                                                                                                                                          | Disabled                                 |
| Default substream mode                                     | Default state of the substream toggle when the channel appears in the viewport. High = force main stream, Low = force substream, Auto = let software decide based on viewport size                                                         | High                                     |
| Default DPTZ mode                                          | Choose how digital PTZ behaves by default: region mode or PTZ emulation                                                                                                                                                                    | Region                                   |
| Timestamp settings                                         | See separate table below                                                                                                                                                                                                                   | Enabled                                  |
| Show decoder information                                   | Show whether and which GPU is currently used for live video decoding                                                                                                                                                                       | Disabled                                 |
| Extend layout sequence duration upon user interaction\*\*  | If enabled, each user interaction with the layout contents resets the sequence duration countdown to the specified number of seconds IF the remaining time is shorter                                                                      | Disabled                                 |
| <p>Interaction with map</p><p>markers</p>                  | Choose how you want to activate map markers (channels, links to other maps etc.): with a single click or a double click                                                                                                                    | Double click                             |
| Enable live preview on maps                                | If enabled, you can hover the mouse over channel markers to see the live channel preview                                                                                                                                                   | Enabled                                  |
| Instant playback default duration                          | Default timeline size for the instant playback mode, in seconds                                                                                                                                                                            | 300                                      |
| Instant playback rewind                                    | Default amount of time to "jump back" when switching from live to instant playback mode                                                                                                                                                    | 60                                       |
| Pause instant playback by default                          | If enabled, instant playback will be paused after switching from live view                                                                                                                                                                 | Disabled                                 |
| Timeline  presentation in playback mode                    | Choose whether you want to see the timeline for the currently selected channel only, optionally with an additional timeline containing all displayed streams' summary, or a separate timeline track for each channel present in the layout | Selected channel plus a summary timeline |
| <p>Preview thumbnails</p><p>on the timeline</p>            | Choose which elements appear when you hover the mouse over the timeline in playback (video thumbnail for timeline and/or bookmarks, or just bookmark details)                                                                              | Video frame for timeline and bookmarks   |
| <p>Allow different layouts for live and</p><p>playback</p> | If enabled, the application will stop synchronising layouts between live and regular playback, allowing you to select a proprietary channel arrangement for playback by dragging and dropping it onto the viewing area                     | <p> </p><p>Disabled</p>                  |
| <p>Pause when playback</p><p>speed is decreased</p>        | Defines how +/- and mouse wheel behaves when controlling playback speed in regular playback. Disable this setting if you wish to have contiguous speed control (one click in any direction increases or decreases speed by one step)       | Enabled                                  |
| <p>Prefer substream for</p><p>archive playback</p>         | Use recorded substream for playback, if available; this setting is good for low bandwidth connections                                                                                                                                      | Disabled                                 |
| <p>Enable automatic</p><p>stream selection</p>             | Enable this option if your channels tend to be recorded on different servers (e.g., failover is in use) and you want to have automatic switching between streams during playback                                                           | Disabled                                 |
| Notification panel font size                               | Font size for the messages appearing in the overlay notification panel                                                                                                                                                                     | 14                                       |
| <p>External service event background</p><p>opacity</p>     | Choose opacity level of the \[coloured] events from external services that appear in the viewport notification area. 0=transparent, 100=opaque.                                                                                            | 30                                       |
| Show images for external service results                   | Keep this enabled if you want to have a thumbnail (if available) alongside with result received from the connected external services                                                                                                       | <p>Enabled</p><p> </p>                   |

\*If decoding/transmission is stopped for the background channels, a certain amount of time is required to restart the decoding after the foreground channel has been minimised back to its viewport. Thus, enabling this option will lower CPU/bandwidth utilisation but increase the delay in presenting the rest of the channels when switching back from the maximised channel view.

\*\*Example: a layout sequence is played and only 23 seconds are left for the current layout. The user clicks a viewport to save a snapshot: the sequence continues to play. Now, only 14 seconds are left for the current layout. The user clicks another channel viewport to save the second snapshot; the current layout countdown is set to 15 seconds (default setting value) so that the layout does not switch in the middle of the user's action. The countdown will be reset each time the user clicks again. Finally, the user does nothing and the sequence switches to the next layout. Note that this setting does not affect the layout duration in the sequence settings.

#### Timestamp Settings

The timestamp is the time displayed over each viewport. All viewports have the same timestamp position and visual settings. By default, the timestamp is a small red label anchored to the top right corner; it fills the whole viewport, and consists of hours, minutes, and seconds.

You can modify the timestamp appearance, or remove it altogether and use camera-side timestamps instead. Note that the Macula timestamp value may differ from that of the camera-side. Also, note that the top left and bottom left/right corners of the viewport are filled with overlay controls by default, so if you place the timestamp there, it may be overlayed by those.

The following detailed adjustments are available for the timestamp:

| Setting              | Available Items                                                                                                                                               | Default Value |
| -------------------- | ------------------------------------------------------------------------------------------------------------------------------------------------------------- | ------------- |
| Show timestamp       | Display the server/client time as channel viewport overlay (in the top right corner of each viewport by default)                                              | Enabled       |
| Show milliseconds    | If enabled, the timestamp overlay will have milliseconds in addition to hours, minutes, and seconds                                                           | Disabled      |
| Font size            | Font size for the timestamp                                                                                                                                   | 12            |
| Font color           | Font color for the timestamp                                                                                                                                  | Red           |
| Word wrap            | If disabled, the text that goes beyond the timestamp area may be cropped                                                                                      | Enabled       |
| Position\*           | Choose one of the presets (top left/right/center or bottom left/right/center) or define your own custom position (will unlock the fine-tuning settings below) | Top right     |
| Horizontal position  | The relative horizontal position of the left boundary of the timestamp (0.0 = leftmost, 1.0 = rightmost)                                                      | 0             |
| Vertical position    | The relative vertical position of the upper timestamp boundary (0.0 = viewport top, 1.0 = viewport bottom)                                                    | 0             |
| Width                | The relative horizontal size of the timestamp                                                                                                                 | 1             |
| Height               | The relative vertical size of the timestamp                                                                                                                   | 1             |
| Horizontal alignment | Choose if the timestamp is anchored to the left corner, right corner, or viewport center                                                                      | Right         |
| Vertical alignment   | Choose if the timestamp is anchored to the viewport top, bottom, or center                                                                                    | Top           |

\*For most cases, one of the pre-defined positions should be enough. If none of these fits your needs, you can create a custom position by changing the timestamp size and anchors. All position boundaries and sizes are relative to the viewport size and can be set using decimal values \[0.0..1.0].

#### Viewport Overlays

Viewport overlays are items displayed on top of the video stream. These are miscellaneous controls, buttons, statistics and metadata.

<figure><img src="https://412599993-files.gitbook.io/~/files/v0/b/gitbook-x-prod.appspot.com/o/spaces%2FeNXnJx0OpvxnmpWqOBNm%2Fuploads%2Fwiv3pcu0ZLYFjMh3LOBH%2Fimage.png?alt=media&amp;token=8742fbe5-8ef0-4b99-a273-884cdd238de5" alt=""><figcaption></figcaption></figure>

You can assign separate settings to each overlay item. Note that, regardless of application settings, some of the controls are not displayed if corresponding action is not available for the target device, e.g., the Instant Playback control item is not shown if there is no recorded archive. The following options are available for each control:

* **Always ON**: always display the overlay element
* **ON if selected**: only display the element when viewport is selected
* **Always OFF**: never display the element

For your convenience, visual overlay elements are previewed on the left side of each setting.

<table><thead><tr><th width="132">Setting</th><th width="359">Description</th><th width="292">Default Value</th></tr></thead><tbody><tr><td>General</td><td><p>Items displayed in the upper-left-hand corner:</p><ul><li>Title (device or resource name)</li><li>Close (a control allowing to close the current stream and free the viewport)</li><li>Lock (a control allowing to lock the stream in its current viewport, making it immune to pop-ups)</li><li>User buttons: one or multiple items</li></ul></td><td><p>Always ON</p><p> </p></td></tr><tr><td>Display status</td><td><p>Data displayed in the bottom-left-hand corner of the viewport:</p><ul><li>Writing On Disk (recording status)</li><li>Motion Detection (motion presence)</li><li>Video Resolution (picture size)</li><li>Video Compression (stream video codec)</li><li>Video FPS (stream frame rate)</li><li>Video Bitrate (data amount, bits per second)</li></ul></td><td><p>ON if selected</p><p> </p></td></tr><tr><td>Display controls</td><td><p>Controls displayed in the bottom-right-hand corner of the viewport:</p><ul><li>Instant Playback (switch mode)</li><li>PTZ Toggle (PTZ and preset controls ON/OFF)</li><li>Digital PTZ Toggle (DPTZ ON/OFF)</li><li>Motion Detection Grid Toggle (MD grid ON/OFF)</li><li>Substream Mode Toggle (switch displayed stream: main/sub/auto)</li><li>Maintain Aspect Ratio Toggle (auto/fill/original)</li><li>Export Snapshot (save frame to library)</li><li>Add User Bookmark (create bookmark and add it to timeline)</li><li>Input Audio Toggle (incoming audio ON/OFF)</li><li>Output Audio Toggle (a press-to-speak audio OUT control)</li><li>Toggle Notifications Pane (ON/OFF)</li><li>Send to Sequence Explorer (switch to sequencing mode)</li><li>Send to Smart Search (switch to motion-based search)</li></ul></td><td><p>ON if selected, except for PTZ controls</p><p> </p></td></tr><tr><td><p>Digital PTZ</p><p>Controls</p></td><td><p>DPTZ and dewarp manipulation tools (OFF by default; when ON, Picture-in-Picture mode and DPTZ toolbar are ON by default):</p><ul><li>Digital PTZ Controls</li><li>Zoom slider (DPTZ zoom IN/OUT)</li><li>Picture in Picture (small preview window in the top left viewport corner when zoomed IN)</li><li>Digital PTZ Toolbar (advanced DPTZ controls: presets, dewarp modes)</li></ul></td><td>OFF by default, except for Picture-in-Picture and DPTZ Toolbar</td></tr><tr><td>PTZ controls</td><td><p>Pan, tilt and zoom controls:</p><ul><li>PTZ Controls (PTZ functionality ON/OFF regardless of HUD /classic sphere presence) *</li><li>PTZ HUD (Heads Up Display, virtual PTZ sphere)</li><li>Iris Slider (iris open/close)</li><li>Focus Slider (manual focus control)</li><li>Zoom Slider (zoom IN/OUT)</li><li>PTZ Toolbar (advanced PTZ controls: presets, tours)</li><li>Classic PTZ Overlay (old style virtual PTZ sphere, visual alternative to HUD mode)</li></ul></td><td><p>ON if selected, except for Classic PTZ</p><p> </p></td></tr><tr><td>Motion detection section</td><td>Show motion detector grid overlay (for software-side MD and only some device-side MD)</td><td>Always OFF</td></tr><tr><td>Video Overlays</td><td><p>Channel shortcuts: interactive colourful links to other channels (set</p><p>up via Macula Console</p></td><td>Always ON</td></tr><tr><td>Playback</td><td>Auto stream selection toggle</td><td>Always OFF</td></tr><tr><td>Crosslink Controls</td><td><ul><li>Refresh</li><li>Back</li><li>Forward</li></ul></td><td>If selected</td></tr><tr><td>Timestamp</td><td>timestamp overlay</td><td>Always ON</td></tr></tbody></table>

\*VCA object **value** is a service-specific information about the object. The actual value type may differ for different analysis types. For example, for facial recognition the value will contain subject name and surname, but for LPR - the car license plate.

These settings are stored in the Macula Monitor application configuration file and are preserved when the application is closed and reopened.

{% hint style="info" %}
\*If you set *PTZ Controls* (Manipulation) to *Always OFF*, you will have to use the *PTZ Toggle* overlay control in order to enable PTZ functionality in live view. If you disable *PTZ toggle* overlay button, too, user will have no access to PTZ from the viewport. In other words, *PTZ Controls* setting affects actual PTZ manipulation availability regardless of presence of the visual controls (HUD or classic PTZ sphere overlay).
{% endhint %}

#### Library

Library is the folder containing all video files and snapshots exported via Macula Monitor application, as well as related jobs - for example, file copying to another location, including CD/DVD. This section allows you to define the library path and some other settings.

<figure><img src="https://412599993-files.gitbook.io/~/files/v0/b/gitbook-x-prod.appspot.com/o/spaces%2FeNXnJx0OpvxnmpWqOBNm%2Fuploads%2FbB5yFNDsCVGpjgRNbIZx%2Fimage.png?alt=media&amp;token=0cb9e566-df5f-4089-8eaa-f2ec60d055a2" alt=""><figcaption></figcaption></figure>

Define the default location for snapshots and exported video to be saved to. The original default location is:

*C:\Users\\\<Windows\_User>\Documents\Macula Monitor*

The only additional setting here is *Show "Save file" dialog box*: if enabled, the dialog box will pop up every time you export a snapshot or a video file, allowing you to select a **custom file destination** every time.

#### Snapshot Export

Macula Monitor supports both single channel and multichannel snapshots (the latter is available from *Playback* mode only). Naming settings here affect both types; for multi-frame snapshots, the channel name $(StreamTitle) will be replaced with the word *Multichannel*.

<figure><img src="https://412599993-files.gitbook.io/~/files/v0/b/gitbook-x-prod.appspot.com/o/spaces%2FeNXnJx0OpvxnmpWqOBNm%2Fuploads%2FcXi7dfEZzKWJZqq8SFQS%2Fimage.png?alt=media&amp;token=57f5ef08-9f73-4263-9428-8610880c0b20" alt=""><figcaption></figcaption></figure>

Set file properties for the exported snapshots. The table below contains a detailed description for each Setting.

| Setting                             | Description                                                                                                                | Default Value    |
| ----------------------------------- | -------------------------------------------------------------------------------------------------------------------------- | ---------------- |
| Snapshot file name                  | File name for exported JPEG snapshots; $(variables) are used for automatic timestamps                                      | Set of variables |
| JPEG quality                        | Picture quality, 1 to 100%                                                                                                 | 60               |
| Subtitles                           | Hard merged subtitles with configurable font; click the *Properties* button to select the subtitle contents and appearance | Enabled          |
| Generate PDF report                 | If enabled, the frame will be saved with details as PDF document                                                           | Disabled         |
| Always use snapshot export settings | If enabled, the settings above will be used for all snapshots, otherwise the user will be prompted for these every time    | Enabled          |

#### Video Export

Set the default video export settings here. All the file types will be playable by the Macula Portable Player application so it is up to you, which ones to select; the settings affect file size and subtitle type availability. Also, some of the formats are required for certain features to work: for instance, POS data overlay is only supported as hard subtitles for MKV format with VP8 compression.

Each format has its pros and cons:

* AVI, original format: quickest, small file size, no subtitles or extras
* AVI + JPEG compression: allows choosing full/quarter resolution, hard subtitles supported; requires more time, large file size
* MP4: small file size, soft subtitles
* MKV, original format: extra small file size
* MKV + VP8 compression: medium file size, additional options available (motion blur, time lapse, data overlay), any subs, takes most time

{% hint style="info" %}
If you wish to embed the **external textual data** with the video, use MKV export format with VP8 compression. MKV format also exclusively allows to export video in time lapse mode.
{% endhint %}

<figure><img src="https://412599993-files.gitbook.io/~/files/v0/b/gitbook-x-prod.appspot.com/o/spaces%2FeNXnJx0OpvxnmpWqOBNm%2Fuploads%2FWwdKQ8tMzblk6QXhmjEq%2Fimage.png?alt=media&amp;token=60c477ee-6cff-4f9c-b4fc-35aebe588772" alt=""><figcaption></figcaption></figure>

The table below contains a detailed description of each setting.

| Setting                                                 | Description                                                                                                                                                                                                                 | Default Value          |
| ------------------------------------------------------- | --------------------------------------------------------------------------------------------------------------------------------------------------------------------------------------------------------------------------- | ---------------------- |
| Video file name                                         | File name for the exported video; $(variables) are used for the automatic timestamps                                                                                                                                        | Set of variables       |
| Video output file type                                  | Choose between AVI, MP4, MKV and frame series.                                                                                                                                                                              | AVI                    |
| Video compression                                       | Keep the original compression or use an output-specific compressor.                                                                                                                                                         | Original when possible |
| Resolution                                              | Choose between full and quarter original resolution if regular compression is used                                                                                                                                          | Full                   |
| <p>Time lapse</p><p>(MKV only)</p>                      | Time (in seconds) to be fitted into one second of output video                                                                                                                                                              | 60                     |
| <p>Include external</p><p>data (MKV+VP8</p><p>only)</p> | If enabled, the VDS (text) overlay will be embedded with the exported video                                                                                                                                                 | Disabled               |
| Subtitles                                               | Enable hard merged (for AVI, frame series) or soft (for MP4, MKV) subtitles for the exported video; click the *Properties* button to set the subtitle format and colour                                                     | Disabled               |
| <p>Maximum resolution for</p><p>Multichannel export</p> | Limit the multichannel video export from playback mode to this total resolution. Multiple streams will be then compiled into a single video file, its resulting resolution not exceeding this value. Options: 2MP/4MP/4K/8K | 2MP FullHD (1080p)     |
| Always use archive export settings                      | If enabled, the settings above will be used for all the exported video clips, otherwise the user will be prompted for these every time                                                                                      | Enabled                |

#### Sounds

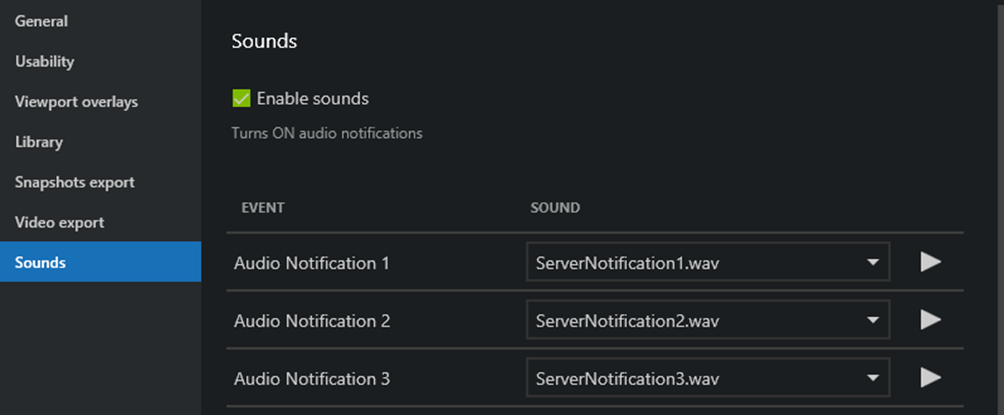
Here, you can choose sounds settings for the server notifications.

When event sending to the clients is configured on the server side, it is merely the sound index number (1-10) that is set, and different notification sounds can be defined for each Macula Monitor application. It is also possible to disable sound for all or any individual notification.
<figure><img src="https://412599993-files.gitbook.io/~/files/v0/b/gitbook-x-prod.appspot.com/o/spaces%2FeNXnJx0OpvxnmpWqOBNm%2Fuploads%2F1fR8RXhHqFp3sWhaXEhC%2Fimage.png?alt=media&amp;token=f9a9cac5-5445-4174-bb2d-9c9d656c2cf4" alt=""><figcaption></figcaption></figure>

Options:

* unmark the Enable sounds setting to **disable audio** notifications (enabled by default)
* for every audio notification (1-10) it is possible to:
* set the **standard notification** sound (default), or
* **disable** sound (select *None*), or
* choose **your own** .wav or .mp3 file to be played.

Use the *Play/Pause* buttons on the right to verify that the audio file sound as desired.

{% hint style="info" %}
Note that if you set a custom sound or no sound for some notification, the default sound will become unavailable.
{% endhint %}

{% hint style="info" %}
When an audio notification is triggered during system operation, there is no option to stop it - the whole audio file will be played back. Keep this in mind when choosing custom sounds. Default audio notifications are quite short.
{% endhint %}

#### Video Analytics

This section contains settings specifically related to the visualization of all kinds of video analytics (VA), and includes several subsections.

The table below summarizes the settings for the video overlays. Similarly to the common video overlays, three options are available for each element:

* **Always ON**: always display the overlay element
* **ON if selected**: only display the element when the viewport is selected (yellow frame appears)
* **Always OFF**: never display the element

Some of the elements are not independent, but are rather details of the main overlay element (e.g., class and area are details of the VA object).

| Setting             | Description                                                                 | Default Value |
| ------------------- | --------------------------------------------------------------------------- | ------------- |
| Zones               | Video analytics detection zones                                             | Always ON     |
| Counters            | VA counters for counting objects                                            | Always ON     |
| Objects             | Objects detected and classified by video analytics that triggered a VA rule | Always ON     |
| Non-alarmed objects | Objects that were detected but did not trigger any VA rule                  | Always ON     |
| Speed               | Estimated object speed, if available                                        | Always ON     |
| Height              | Estimated object height, if available                                       | Always ON     |
| Area                | Estimated object size, if available                                         | Always ON     |
| Class               | Object class, as classified by the running VA engine                        | Always ON     |
| Identifier          | Object ID                                                                   | Always ON     |
| Value               | Detected value, if applicable (LPR number plate or person's name for FR)    | Always ON     |

Additional settings:

| Setting                         | Description                                                                                            | Default Value |
| ------------------------------- | ------------------------------------------------------------------------------------------------------ | ------------- |
| Analytics metadata item opacity | The opacity of metadata visuals (bounding boxes etc.) in percents; 0 = fully transparent, 100 = opaque | 30            |

Finally, you have an option to control all colors of all VA object classes, including unclassified and unknown objects.

<figure><img src="https://412599993-files.gitbook.io/~/files/v0/b/gitbook-x-prod.appspot.com/o/spaces%2FeNXnJx0OpvxnmpWqOBNm%2Fuploads%2F0cKQGRgBDsY3z63JBlrv%2Fimage.png?alt=media&amp;token=35c2d05e-ba3d-47df-837d-046a7dca9478" alt="" width="563"><figcaption></figcaption></figure>

To change the target color, uncheck the *Random* option and click the color on the right, then choose the desired hue from the palette.

#### HTTP API

Settings in this section are for development purposes.

#### Import and Export Application Settings

Macula Monitor application preferences can be saved and exported as a file, so that they can later be used on other workstations running Macula Monitor, or restored on the same workstation after re-installing the software. When importing, make sure that the Macula Monitor version on the target PC is the same or newer.

It is possible to handle the following settings:

* **Server connections**: the list of server addresses, ports and user names, as well as connection properties
* **Application settings**: all appearance and usability settings defined under main menu *View* > *Application settings* plus keyboard shortcuts (see exceptions below)
* **Local resources**: local channel layouts and also layout sequences

The following settings are NOT exported:

* paths: video export library and sounds
* application themes (export available via themes tool)
* administration tool preferences
* window settings (multidisplay setup)

To **export** your preferences, go to the main menu in the top right corner, and choose *Tools* > *Export Settings*. A separate dialog box will pop up.

<figure><img src="https://412599993-files.gitbook.io/~/files/v0/b/gitbook-x-prod.appspot.com/o/spaces%2FeNXnJx0OpvxnmpWqOBNm%2Fuploads%2FSfp9tQ9mzkUEFI8bN0N1%2Fimage.png?alt=media&amp;token=cb756d2b-3b8c-4ac1-a8b5-7bb06db07bc5" alt="" width="563"><figcaption></figcaption></figure>

In the export dialog box, choose the destination folder for the \*.lxm file. Below, select what settings will be exported; by default, all of them are chosen. You can save the settings partially, for example, export the list of server connections into a separate file. When ready, hit the *Export* button. After the export is complete, you will get a confirmation; and, you will get a warning in case the target file cannot be created (e.g., not enough user permissions to write to the specified location). In the latter case, select a different folder and try again.

The **import** procedure is very similar: go to the main menu *Tools* > *Import Settings*, locate the \*.lxm file, select desired settings to be loaded and click *Import*. Note that the imported usability settings will overwrite the existing ones, and the resources are imported using the following logic:

* layouts and layout sequences with identical names will not be imported - currently present resources have priority
* servers with at least one different connection property (IP/host, port, domain or user name) will be appended

For instance, when importing a list of servers with the same host name and port but different user names, all servers will be appended to the connections with their corresponding names. Servers with identical connection properties but different preferences (merge resources, multicast/unicast) will be ignored (not imported).
