> For the complete documentation index, see [llms.txt](https://gsfcorp.gitbook.io/macula/llms.txt). Markdown versions of documentation pages are available by appending `.md` to page URLs; this page is available as [Markdown](https://gsfcorp.gitbook.io/macula/administration-guide-v1.33.0/add-devices-manually.md).
# Add Devices Manually
You can add devices manually instead of using autodiscovery in the following cases:
* actual devices have not been connected yet
* devices are not connected at the current stage but it is planned that they will be connected later
* the server needs to be configured while being away from its future position
* some devices in use cannot be automatically discovered
{% hint style="info" %}
Only IP devices can be added manually. Attached devices (e.g., capture boards) require autodiscovery.
{% endhint %}
#### Add single device
To access the configuration dialog box from Macula Console, open the *Configuration* section and select *Devices* in the menu on the left; in the upper panel, then click the *+ New device* button.
Enter a user-defined name for your new device and pick a model. If your camera model is not listed, select the closest similar model or choose a generic type.
After you have chosen manufacturer and model, additional tabs will become available in the main configuration dialog box: *Network* and *Channels*. These tabs are described in details later in this section.
#### Details
| Setting | Description | Default value |
| ----------- | ------------------------------------------------------------------------------------------------------------------------------------------------------------------------------------------------ | ------------- |
| Title | User-defined device name | \[empty] |
| Model | IP device manufacturer and model, or generic type | \[empty] |
| Hardware ID | Unique hardware identifier containing a device hardware identifier; this filed should be left empty, as it will be filled automatically later, when the device has been connected and identified | \[empty] |
#### Membership
Choose groups for the current device to become a member of. Use *Add* and *Remove* buttons below or double-click to manipulate groups. One device may belong to several groups at once.
#### Permissions
Add users and/or user groups simply by checking at least one permission for the target server; remove by clearing permissions - either by deselecting them or by clicking the *Clear* button below. You can also double-click users to remove them from the list of privileged users. Devices with an empty permission list will not be available to anyone except for the root (global) administrator.
#### Network
Enter TCP/IP settings for device access here.
Before filling in the details, make sure the settings match those on the camera. If device has not been connected yet, ensure that the same settings are applied during the camera installation. You can use the *Ping Device* button to check camera availability and/or verify your settings; the *Open Device* *in Browser* button will try to reach your camera Web interface using you default browser.
| Setting | Description | Default value |
| ----------------- | -------------------------------------------------------------------------------------------------------------------------------------------- | ------------- |
| Host | Device IP address | \[empty] |
| Port | Device HTTP port | 80 |
| Secure Connection | Secure connection (HTTPS must be enabled on the device) | Disabled |
| Username | Device user credentials; note that you need to provide a valid administrative user profile to be able to change device settings via software | \[empty] |
| Password | Password for camera access | Enabled |
In order to enable HTTPS connection:
* change port to 443 (or whatever port is used/forwarded for secure HTTP)
* enable Secure connection option
Note that HTTPS must be enabled on the device side for this feature to work properly. On the other hand, if you are not planning to enable HTTPS in the software, disable HTTPS on the device side. Different settings on the device and software side may cause malfunctions (e.g., device metadata will not be available).
#### Channels
Here you can detach automatically detected channels from the device and replace them with one of the existing 'free' channels (not attached to any device). Use the *Reset* button to undo any changes made to the channels (this only works for current editing session, reset will not be available after you save the changes and reopen this dialog box).
If you wish the original camera channel(s) to stay attached to the device, just leave the channel list as it is.
#### Add multiple devices\*
\*Feature is subject to license limitations and may be unavailable in some software editions.
If you have a number of devices of the same type in your system, you can add them all at once to save time. This method is also suitable is you have multiple groups of devices of the same type.
Open the *Configuration* section and select *Devices* in the menu on the left; in the upper panel, click the little arrow next to the *+ New device* button and select *Create multiple devices*.
#### Add devices
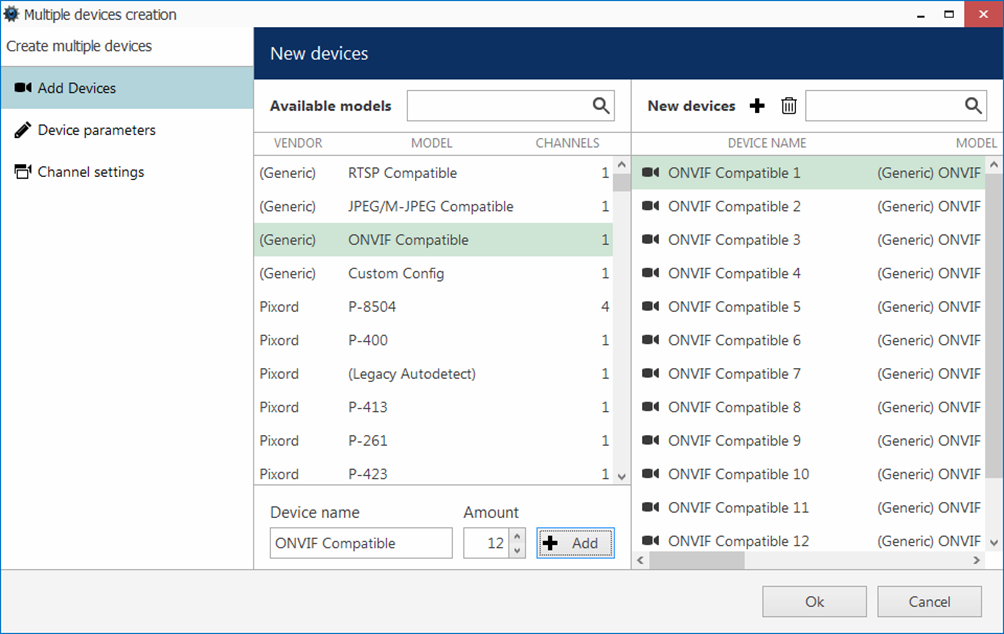
You can add any number of different devices here (assuming this is permitted by license limitations). First, select the device model from the list, and then enter your desired number of existing devices of the same model.
When you are ready, click the *+ Add* button below to attach the camera set to the new devices list. As soon as there is at least one device, additional tabs will become available: *Device Parameters* and *Channel settings*. Device list on the right will be available in all tabs.
To **remove** any of the listed items, select them with your left mouse button (use *CTRL+click* or *Shift+click* to select multiple devices at once) and hit the *Delete* button on the upper panel or on your keyboard. Select any device and use the  *Add* button on the upper panel to add a copy of that device.
{% hint style="info" %}
Starting with version 1.26, the system no longer uses Legacy authentication by default when adding multiple devices manually. If your cameras use legacy auth (old/legacy cameras and firmware versions), please do the following after adding devices:
1. Go to Configuration > Devices and select your device.
2. In the pop-up window, navigate to Advanced Configuration.
3. Check the Use Legacy Authentication checkbox.
{% endhint %}
#### Device parameters
For each added device, enter corresponding settings. Note that you can skip IP and port on this step if you wish to use automatic incremental IP assigning (see *IPs and Ports* tab description below).
Select a device by clicking on it in the item list: it will become highlighted green and related available settings will be displayed in the *Device parameters* window. You can select multiple devices by holding *CTRL* or *Shift* when clicking.
| Setting | Description | Default value |
| ----------- | -------------------------------------------------------------------------------------------------------------------------------------------- | -------------------- |
| Device name | User-defined device name | Device model |
| Model | Device manufacturer and model, or generic type; click Change to alter | Loaded automatically |
| Host | Device hostname or IP address | \[empty] |
| Port | Device HTTP port | 80 |
| Username | Device user credentials; note that you need to provide a valid administrative user profile to be able to change device settings via software | \[empty] |
| Password | Password for camera access | \[empty] |
| Server | Target server, to which the device will be attached | Central Server |
When you have finished, click the *Apply* button below for the changes to take effect.
{% hint style="danger" %}
If you do not apply the modifications, they will be discarded when you select a different device from the item list. Remember to always click the *Apply* button.
{% endhint %}
You will be asked to review the list of modified fields and confirm the changes.
Click *OK* to accept the changes and go back to the configuration dialog box.
You can select multiple devices and assign IP addresses incrementally with the defined increment. Similarly, it is possible to change the HTTP port for all devices at once, if required (port value stays the same for all selected devices, with no increment). In order to do this, select desired devices by using *CTRL+click* or *Shift+click*, then start entering the IP address: the field will expand, giving you the option to enter the increment.
Click the *Apply* button below to save the changes, similarly to the previous step.
#### Channel Settings
Here you can modify channel names and recording configuration. Note that channel name is not copied from the device name.
Unlike with automatic device discovery, default recording configuration here is \[none], meaning that recording is not conducted. Select one or multiple devices and then click the *Change* button in order to choose an existing recording configuration for the target devices or create a new one.
Depending on the selected device model, the number of channels may coincide with or exceed the number of devices, e.g., when device is a 4-channel encoder.
Select one or multiple devices and click Change, then select appropriate recording profile or create a new one.
When you have finished, click OK to add all the new devices and their channels to your server configuration.